Wednesday, January 15, 2014

Organization in a 1:1 Classroom

To say I am organized is an understatement.  In my classroom, everything has a place, is color-coded, and labeled.  Now, getting 22 students to go along with that organization is another story.  But I try.  The organization involved with bringing Chromebooks into the classroom, or any device, was a lot more involved than I thought!  So Larissa and I wanted to share what we are doing to keep the Chromebooks organized throughout the day.


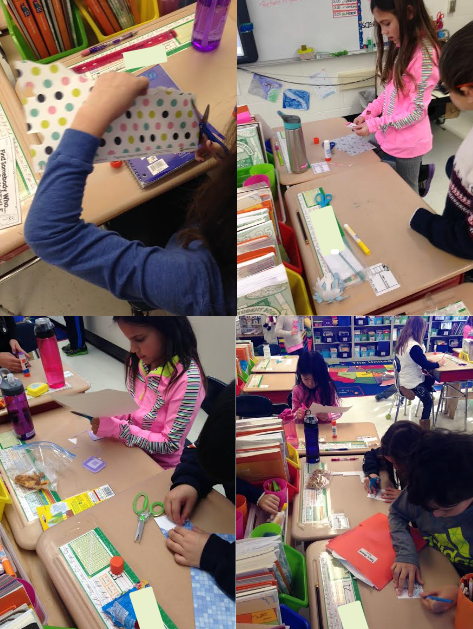
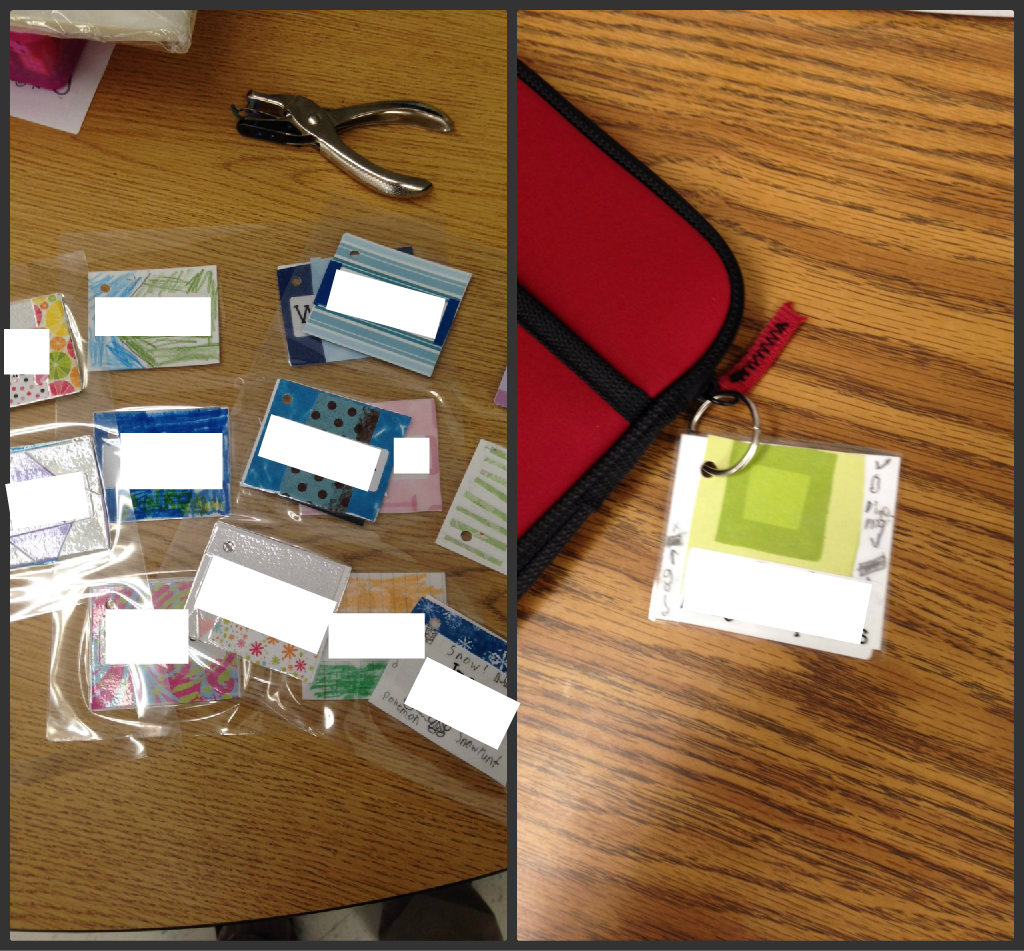
As mentioned before, our students have luggage tags on their Chromebook cases.  The cases were provided by the district, and are all the same.  This identifies their case from other students, both in our class and throughout the school.  These can be made any way you would like! These have proven essential as students bring their cases in each morning and pack up each afternoon.
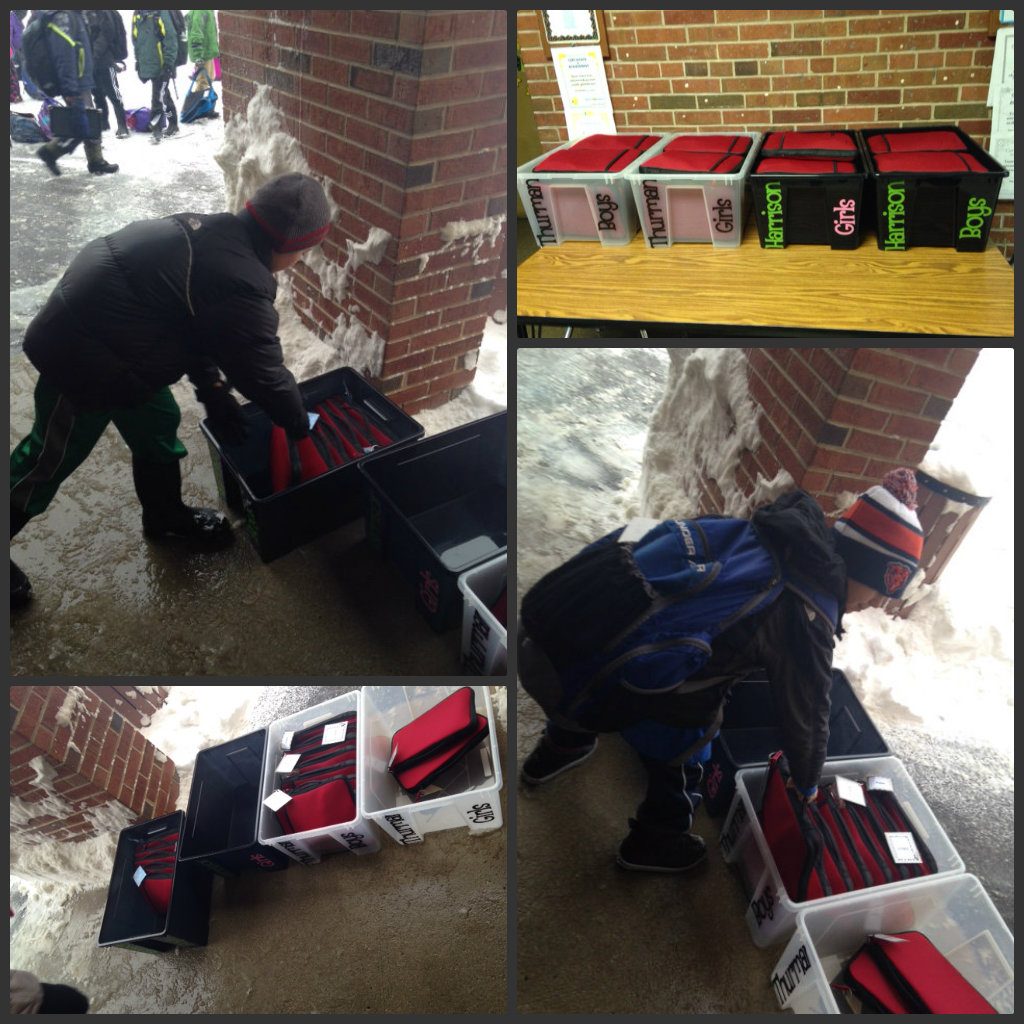
When the students arrive at school, they usually leave their backpacks on a line by the playground.  This wasn’t going to work with the Chromebooks!  Over winter break, we stumbled on a great deal at Ikea for plastic bins.  These are set outside each morning and students place their Chromebooks in them when they arrive at school.  2 students carry in each bin to the classroom when the bell rings.
As students come in each morning, students take their Chromebooks out of their cases and places them in a dish rack.  I have 2 in the room, one for each side of the classroom.  Students store their Chromebooks here when they are not being used.  The dish racks were really cheap - one came from a resale shop and the other was clearanced at Bed, Bath, and Beyond and both have 14 spaces.  
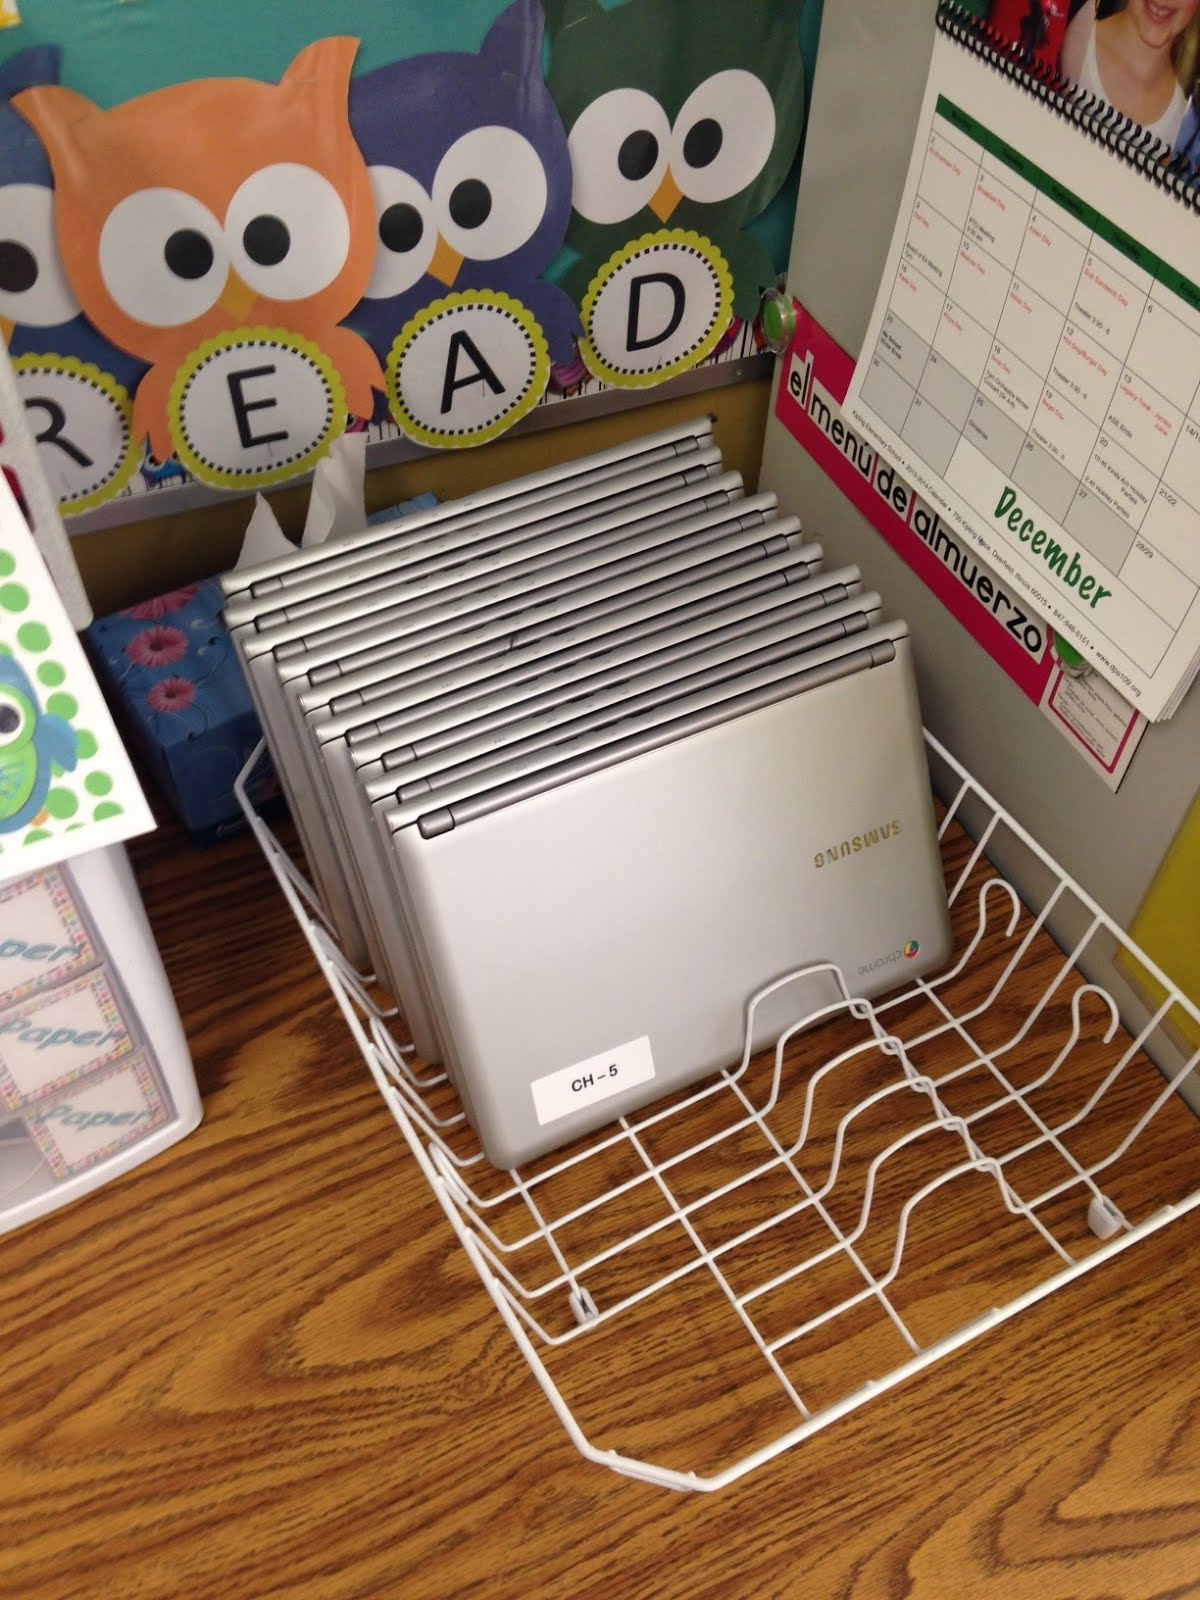
They are a great, safe place for the Chromebooks to sit when they are not in use, and an easy place for students to grab them when they are needed!  The idea came from Pinterest, although I’m not sure who originally posted it.  My students leave their cases in the bins throughout the day, which I store under a table, out of the way.

What are you doing to organize technology in your classroom?  We are also working on some digital organization, stay tuned!

Thursday, January 9, 2014

Day One With 1:1

Our first day with the Chromebooks was full of excitement (and lots of questions!) When the students walked in and saw big bins full of red cases, their eyes lit up and they knew immediately what was inside.


Even though our students are very familiar with using the Chromebooks, they have never had one to call their own. So Christi and I planned a few activities to do with them and let them have some time to just play around.
First we took a few minutes to go over our “Chromebook Guidelines and Expectations.” We were surprised by how many questions the kids had. Of course they wanted to know if they could get their own cover or case (unfortunately our district is not allowing this for the pilot) and they wanted to know how they could use them at home. They were particularly interested in finding out how to add apps and games to their Chromebook and wondered if they could take it with them on vacation :) 
Once they opened their Chromebooks they logged in and took a picture to set as their login pic. Their smiles went from ear to ear. Then we took them through Chromebook Bootcamp. The bootcamp presentation was created by Sue Ferdon (a tech coach at South Park Elementary School). It teaches the students more about the Chromebooks and allows them to become more familiar with some of it’s special features. The students really liked the tips and tricks with the keyboard. We gave them some time to play with these tools. Then they had a chance to personalize their background and settings.
Our district provided the students with bright red Belkin cases that fit the Chromebooks like a sleeve. Since they are all the same we wanted the kids to have something personal that they could use to tell theirs apart from their classmates. So we spent some time letting them create a “luggage tag.” Christi’s class was given half of an index card and a sticker with their name on it. They were then allowed to cut pieces of scrapbook paper to decorate their tag any way they wanted to. Larissa’s class was given a piece of paper with their name on it and a border around their name. They then got to choose a piece of scrapbook paper to put their name on. We then laminated the tags and attached them to the zipper with a binder ring. Both classes’ tags turned out to be very cute!

Overall it was a successful launch to our pilot and the students and parents have had nothing but positive feedback.


Here is a review of the things you should know and do for your first day…

  • make sure all of the Chromebooks are charged (Some of Christi’s died and had to be charged before they could even be used) 

  • have a plan of where you are going to store them
  • make luggage tags for the cases to tell them apart
  • plan for longer than you anticipate to go through your introduction, rules, and “play time.” The kids will have more questions than you think.
  • be prepared to answer questions and know what your expectations and guidelines are going to be.
  • have some sort of communication with the parents prior to sending the Chromebooks home and be prepared to answer their questions as well. (Check our Parent Resource Tab for all of the documents, presentations, and resources we provided our parents. Also look for questions and answers that we received from our parent meeting in the FAQs tab.)

Tuesday, January 7, 2014

They Have Arrived!

The Chromebooks are here and we are ready to distribute them to the students tomorrow. We can't wait!!!


Displaying photo.JPG

Thursday, January 2, 2014

Creating and Personalizing our Blog

Larissa and I both love creativity, uniqueness, and color and were not excited about having to use the templates provided in Blogger to design our blog.  So we went searching for more colorful designs and being teachers, we didn’t want to spend any money.  So our search brought us to Shabby Blogs, a fun site with a large number of choices for designs.


After spending a little too long looking through the options, we settled on one and chose a header to coordinate.  The site has a great tutorial to help you add pictures and font to the header.  It was very easy to add the header to our blog once we had saved it to the desktop.


Now that the page was colorful and creative, we continued to edit and customize, lining things up, making fonts match, and finding ways to place each part exactly where we wanted it.  The web is filled with resources to tweak each part of the page.  Here are a few we used in our process:


Finally, we added our own personal signature to the bottom of each post.  Warning - this was more complicated than we anticipated! We used the tutorial here, but instead of using picmonkey to add our font, we added it right in paint.  After that we followed the steps for adding a little doodle, and applying the signature to all of our posts.  We love this personalized touch!


With the use of these tutorials, and some time just trying things out to see what would work, our page was ready!  While this took some time, we feel that making our blog personal will help us to continue being excited about sharing all of our trials with our 1:1 implementation!


So try it out!  In case the links above don’t work, visit our Resources page to find all of them.

Preparing to go 1:1

In October of 2013 our very generous district presented an opportunity for teachers to apply for a grant to receive a class set of Chromebooks. Both Christi and I felt compelled to apply for the grant in hopes of creating a more inspiring, innovative, engaging and student-centered learning experience through the implementation of 1:1 technology.
And so our journey began with researching every blog post, twitter post, and educational journal we could find that discussed the topic of 1:1 technology. Our minds began to spin as we discovered the never ending possibilities. Our motto became, “Let’s take it one step at a time…”
After spending a great deal of time looking into how we would use these Chromebooks, if we were provided with the opportunity to receive a class set, we began writing our grant proposals. This was an exciting and yet exhausting process. (If you would like to read our grant proposals here are the links: Larissa’s proposal & Christi’s proposal.)
Fast forward two weeks later...both of our proposals were accepted and we were each going to receive a set of Chromebooks in January! We were thrilled and decided that we didn’t want to wait until January to begin implementing some of the incredible tools and websites available for our classrooms.
So we started slowly, which is our biggest advice to anyone who is about to implement 1:1 technology or any type of technology for that matter. We began teaching our students how to become more savvy with Google docs, presentations, and forms. We then signed our classes up on Edmodo and taught our students about the world of social networking within the confines of a safe and educationally engaging environment. We also taught our students how to become more effective researchers as well as how to safely navigate through the internet. (Check out our blog at a later date to learn more specifics about some of our early implementation of technology.) Our students began to feel more comfortable using the Chromebooks and exploring their potential.
The more we implemented the use of technology the more our students were inspired to create new ideas and learning experiences for themselves. We quickly learned that our students have the ability to teach us just as much about using technology and the benefits as we could teach them. We would often hear our students saying, “Well I think you could do it this way,” or “Could we use [blank] to do that?” This only inspired us to further explore and implement.
Now that we are only days away from receiving our Chromebooks we are filled with anticipation, fear, and excitement for all that is to come. Our blog will be a place where we will take you with us on our journey of implementing 1:1 technology. We hope to inspire and encourage you through our successes and much anticipated failures.

Please feel free to comment on any of our posts about your own personal experiences or questions you may have about our journey. We look forward to sharing with and hearing from you!